EMS Release Testing

Before any EMS upgrade, EMS Leadership Team members are responsible for testing EMS features that their departments rely on utilizing our development environment. This includes testing departmental process templates and unique features (e.g. billing, Master Calendar, EMS APIs, etc.) their department relies on. As you complete testing items, please fill in your results in the spreadsheet below:
EMS Upgrade Testing Plan (spreadsheet)
To log in to our development EMS environment, you will need the EMS Launcher. Follow the instructions below to install the EMS Launcher. If you’re having trouble with your EMS Launcher, refer to our troubleshooting section for help if you’re having trouble with the EMS Launcher.
EMS Launcher Install/Update Instructions
- Download the EMS Launcher.
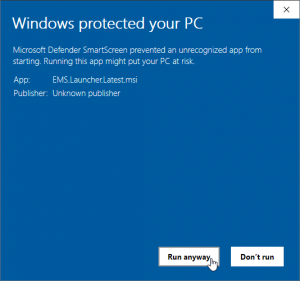
- Double-click on the EMS Launcher installer (EMS.Launcher.Latest.msi) you just downloaded.

- Click “More Info”, and then the”Run anyway” button.

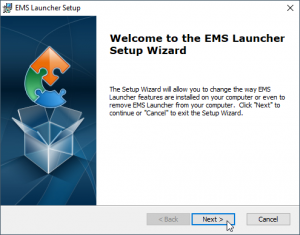
- Accept all the installer defaults (keep clicking Next) and finally click “Finish”.
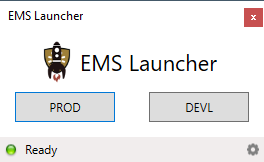
- Delete the EMS shortcut on your desktop (see below).

- On your desktop, double-click on the EMS Launcher icon and the Launcher will start.

- Click the button for the environment you wish to log in to (PROD=production and DEVL=development/testing).
- EMS will install if needed and eventually the log in screen will appear. Sign in with your email address and WFU password.

- Always use the EMS Launcher to log in to EMS. Failure to do so may result in logging into the wrong environment.
The EMS Launcher will automatically keep your EMS Client up to date for each environment (production and development). Do not use the EMS provided shortcut.
EMS Launcher Troubleshooting
If you still have trouble after completing the steps below, or simply don’t understand the instructions, feel free to contact an EMS Advisory Team member from IS.
- Close EMS if you have it open.
- Connect to WFU’s VPN.
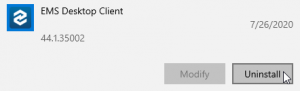
- Now, uninstall EMS and the EMS Launcher. To do so, click on the Start button and type in “remove”. Click “Add or Remove Programs”.
- Select “EMS Desktop Client” from the list of programs and click “Uninstall”. EMS will begin to uninstall. Also uninstall the “EMS Launcher”.
- Delete the following folders on your computer.
C:\Users\YourUsername\AppData\Roaming\EMS Launcher\
C:\Users\YourUsername\AppData\Roaming\EMS2106\
C:\Users\YourUsername\AppData\Roaming\EMS2016 – DEV\ - Reboot your computer.
- Reinstall the EMS Launcher using the instructions above.